
Driving with a cracked or chipped windshield isn’t just an eyesore; it’s a safety hazard.
But guess what? You don’t need to dash to an auto glass repair shop and break the bank for minor fixes. Armed with a windshield repair kit and a sprinkle of patience, you’ve got this!
Check out our step-by-step guide to breeze through the process. Let’s do this!
Understanding Windshield Repair Kit
Windshield repair kits are handy tools designed to fix small cracks and chips in your windshield quickly and effectively. These kits typically contain everything you need to perform the repair, including resin, curing strips, and a curing light. While they may not be suitable for larger damages or cracks that obstruct your vision, they can work wonders for minor imperfections.
Step 1: Assess the Damage
Before you begin your DIY repair, carefully inspect the damage to your windshield. Determine if it’s a chip or a crack, as the repair process may vary slightly. Chips are usually smaller and look like a bullseye or star, while cracks are longer and can spread across the glass. If the damage is extensive or obstructs your vision, it’s best to seek professional auto glass repair in Anaheim.
Step 2: Clean the Area
Clean the damaged area and the surrounding glass thoroughly using a glass cleaner and a lint-free cloth. This step is crucial as any dirt or debris left on the windshield can affect the adhesion of the repair resin and compromise the effectiveness of the repair.
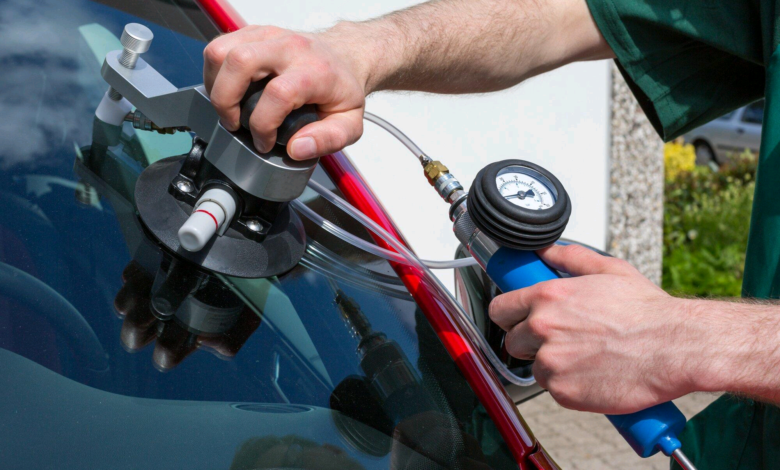
Step 3: Apply the Repair Kit
Follow the instructions provided with your windshield glass repair kit to apply the resin to the damaged area. Typically, this involves placing the applicator over the chip or crack and injecting the resin into the damaged area using a syringe-like tool. Make sure to fill the entire chip or crack with resin to ensure a proper seal.
Step 4: Cure the Resin
Once the resin is applied, cover the damaged area with a curing strip provided in the kit. Place it directly over the resin-filled chip or crack, ensuring that it covers the entire area. Then, use the curing light included in the kit to expose the resin to UV light. This process cures the resin, hardening it and bonding it to the glass.
Step 5: Remove Excess Resin
After curing the resin, remove the curing strip and scrape off any excess resin using a razor blade or similar tool. Be careful not to scratch the surrounding glass while doing so. Once the excess resin is removed, clean the area again with glass cleaner to ensure a clear finish.
Enjoy Clear Visibility
With the help of a windshield glass repair kit, fixing minor cracks and chips in your windshield is a straightforward process that you can do yourself. By following these simple steps, you can restore the integrity of your windshield and enjoy clear visibility on the road ahead.
However, remember that while windshield repair kits are suitable for small damages, larger or more severe issues may require a professional auto glass repair. So, next time you notice a chip or crack in your windshield, don’t panic – grab a repair kit and get to work!
Looking for more valuable tips and guides? Our blog offers a wealth of information on various topics that can help.


